The legacy “MBR” partitioning scheme limits the number of drives to four and, on some older virtual machines, I fell into a trap of expanding LVMs by adding more physical volumes. This was not an issue until I went to reboot the machine and it failed.
Note – all of the below was performed on a production system without service interruption. There are easier ways of doing this if the server could be taken offline.
Here was the problem:
root@vm01:/root# pvs -o+pv_used
  PV         VG   Fmt  Attr PSize   PFree Used
  /dev/xvda1 sys  lvm2 a--  <10.00g    0  <10.00g
  /dev/xvdb1 data lvm2 a--  <30.00g    0  <30.00g
  /dev/xvdc1 data lvm2 a--  <50.00g    0  <50.00g
  /dev/xvde1 data lvm2 a--  <50.00g    0  <50.00g
  /dev/xvdf1 data lvm2 a--  <50.00g    0  <50.00g
  /dev/xvdg1 data lvm2 a--  <60.00g    0  <60.00g
I ended up with six physical volumes. My “data” volume group spanned xvdb through xvdg (five PVs). To resolve this, my plan was to add a seventh (!), move xvdb’s data there, then replace xvdb with a much larger volume and then move everything from xvdc, xvde, xvdf, xvdg to the new xvdb.
First, I extended the data VG by adding a new PV xvdh1 at 31G (just an extra 1G to ensure I would have no issues moving xvdb’s 30G over). I then moved the data out of xvdb via:
# # reduce the data VG by removing xvdb1 # vgreduce data /dev/xvdb1
# # finally, remove the PV itself pvremove /dev/xvdb1
On the hypervisor (Xenserver / XCP-ng) in my case, I resized the underlying virtual drive for xvdb by deactivating it, resizing it, and re-activating it. Then on the virtual machine, I used cfdisk to resize it to use the additional space. (If it’s a GPT partition, this may help). Then:
# # create a new PV
# pvcreate /dev/xvdb1

# # extend the data VG to use the new PV
# vgextend data /dev/xvdb1
Then, for each of xvdh1, xvdg1, xvdf1, xvde1, and xvdc1 (denoted as xvdX below) do the following:
# # move data off xvdX
# pvmove /dev/xvdX

# # reduce the data VG by removing xvdX
# vgreduce data /dev/xvdX

# # reduce the data VG by removing xvdX
pvremove /dev/xvdX
Then, on the hypervisor, remove these hard drives from the virtual machine leaving only xvda and the much enlarged xvdb.
I was delighted to help celebrate Euro-IX’s 20th anniversary today by giving a talk on Our Community and IXP Manager. My goal was to show that collaboration is a two-way street with IXP Manager by taking a look at how our community has helped the project and reflect on how the project helps our community.
I was delighted to help celebrate Euro-IX’s 20th anniversary today by giving a talk on Our Community and IXP Manager. My goal was to show that cooperation is a two-way street with IXP Manager by taking a look at how our community has helped the project and reflect on how the project helps our community. The event was of course online and you can find full details here: Euro-IX – 20 Years of Cooperation.
Euro-IX is my favourite event in our industry and I attended my first one on behalf of INEX when it was in Rome in 2009, accompanying the late Barry Rhodes. Since then, I’ve attended at least one of the two every year.
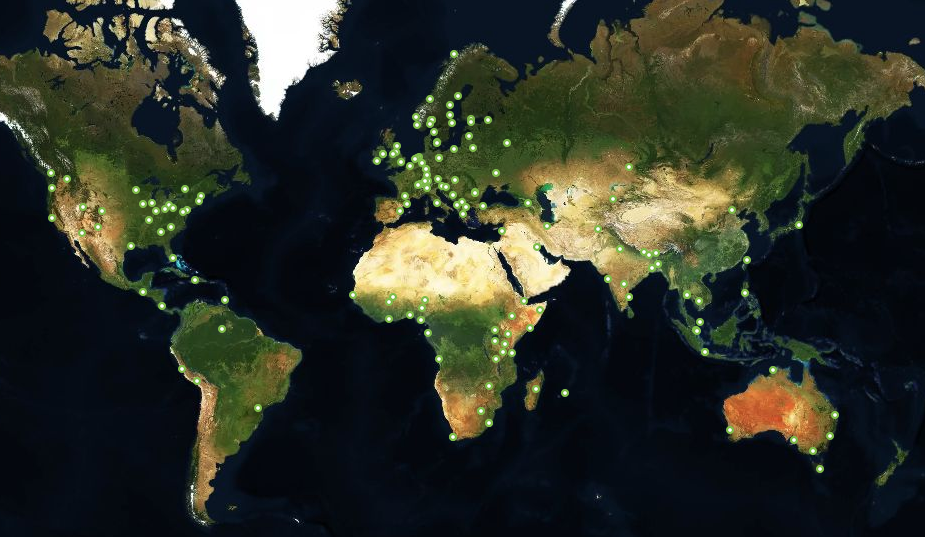
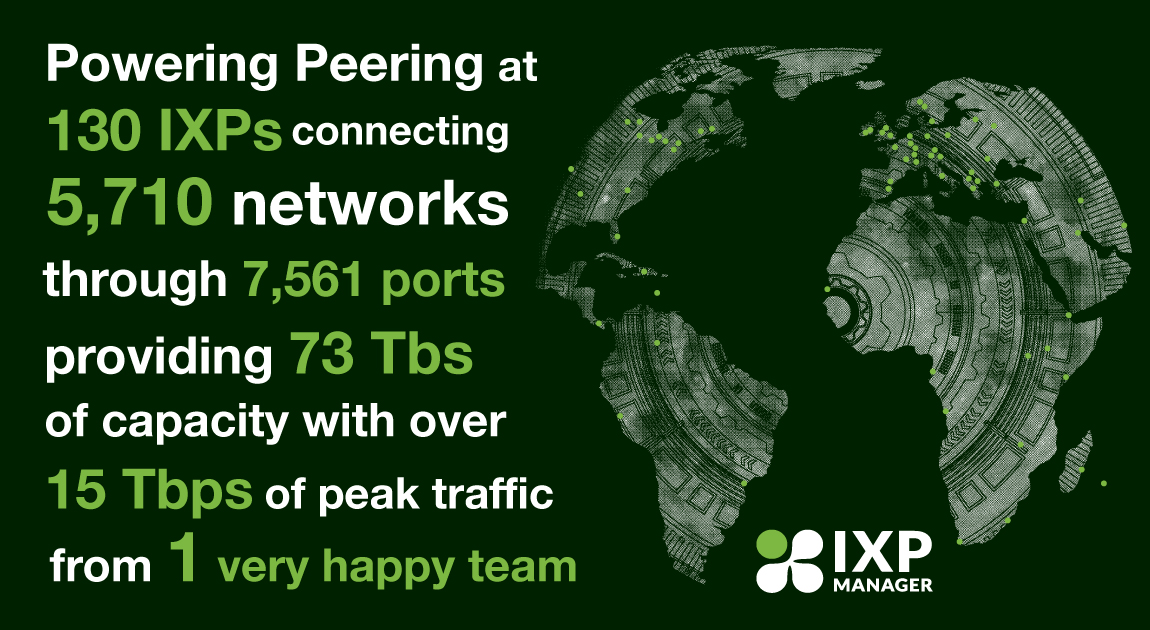
I began with a brief update on the current status of the IXP Manager project. An image I and the team at INEX take great pride in sharing is the following world view with 166 green dots – each dot representing an IXP that uses IXP Manager.
We, INEX and the IXP Manager project, launched a new website in June 2020. This site has a database backend that stores the 166 IXPs noted above and generates the above image dynamically. On a nightly basis, it also polls these IXPs in one of two ways:
If the IX-F Member Export is enabled and publically available, we will pull the current data from this. This is the case for 98 of the 166 and this data is real-time and accurate.
For the rest, we’ll use PeeringDB which requires networks (members of IXPs) to assert that they peer at an exchange and so these numbers will be a significant undercount.
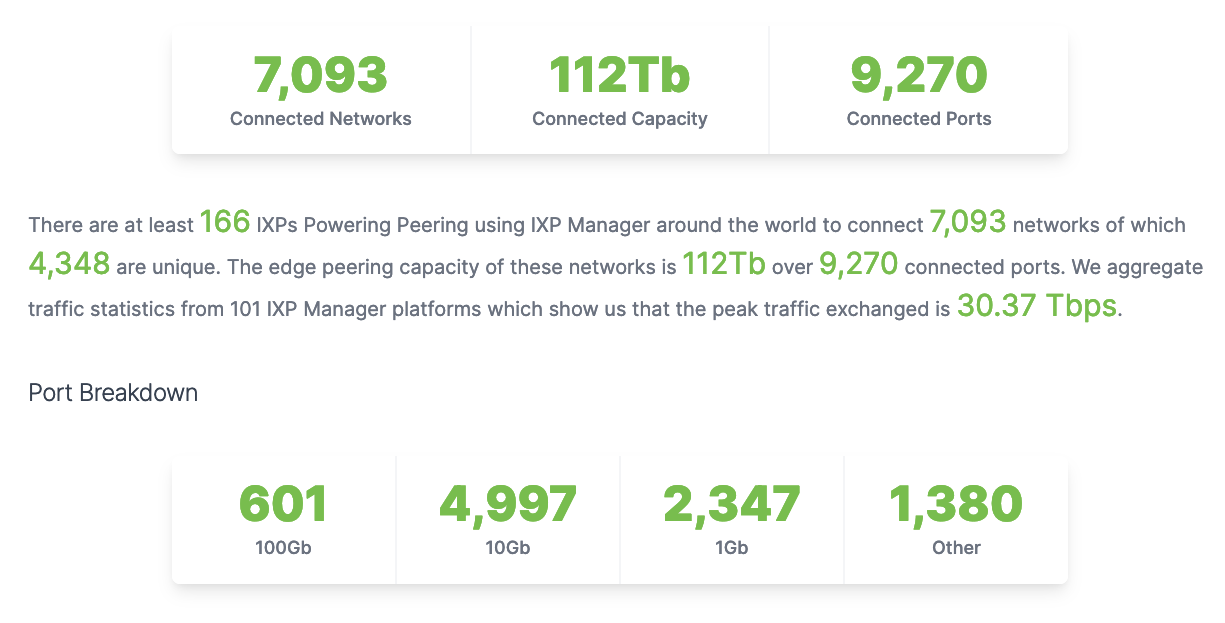
The resulting stats, as of 27th June 2021, were presented next:
Now we’re getting into the meat of the presentation by looking at some of the things that the Euro-IX – and wider – community give IXP Manager. The first tangible item is community contributions which mostly cover the costs of a full-time developer. This program is currently in its fifth year. Rather than repeating what I said, please see this page on the website for details.
The next slide was about knowledge. This is possibly an under-discussed and under-valued aspect of Euro-IX in general. Knowledge is a very valuable commodity in most industries that is aggressively protected with NDAs, patents, and contracts. Yet, at Euro-IX forums, the operators of IXPs come together to learn; to create knowledge; and to share knowledge – openly and freely. The best of this community knowledge gets distilled into IXP Manager which, as we always say, teaches and implements best practices – and these practices have in part come from this creation and sharing.
One of the things I’m most proud of in our new IXP Manager website is the contributor wall of fame. Anyone who makes at least five contributions to the project through the GitHub platform will appear here which, as of today’s date, has just over 40 people. Any of the following will count towards a contribution:
Possibly the hardest: contribute code through a pull request.
Open an issue (bug report or feature request).
Simply comment on an existing issue (or your own!).
Contribute editorial fixes/content to the documentation.
This section was rounded out with a shortlist of other sources of community collaboration. The first was the coffee breaks between sessions and the conversations over drinks at the socials at Euro-IX forums. These relaxed environments allowed for more long-form free-flowing discussions with IXP Manager users to help flesh out potential features and to understand where the problems, grit, and rough edges exist. The information learned from these conversations then feeds into later versions of IXP Manager. I miss these face-to-face engagements and, hopefully, we can get back to them soon.
Finally, I wanted to give a specific mention to the open-source community in general. Before I was ever involved in IXPs, INEX, or IXP Manager, I had (and continue to have) an involvement in other open-source projects. For IXP Manager, the FOSS community has given us wide-ranging tools from the PHP language itself to Laravel – the web application framework we use, and right through to front-end libraries such as TailwindCSS and jQuery.
Of course, when we mention open-source in the IXP community, we have to give a nod to Bird, the internet routing daemon, which is the powerhouse of so many of our route server implementations. Hopefully, we’ll also find the time in 2021 to add OpenBGPd support to IXP Manager.
IXP Manager – Giving to Our Community
The is the other side of the two-way street and I wanted to touch on some of the things we hope IXP Manager gives our community. This isn’t about new releases, or functionality or features. And it’s not about being boastful or giving ourselves a pat on the back. It’s aspirational – it’s about what we think – what we hope – IXP Manager gives the community. It’s also not something we can claim success for – it’s up to the community to decide if we’ve succeeded here.
This first element of this was our mission statement – our vision / hope for the project and why we open-sourced it:
Our vision for IXP Manager and the basis for making it a free-to-use, open-source project was that it might enable the creation of IXPs where they are required.
The existence of these IXPs would, in turn, create a stronger, open, more robust and better-connected internet.
This very much goes back to the kind of people involved in IXPs. For most of us, the notion of for the good of the internet is part of our DNA.
The next thing I hope IXP Manager gives the exchanges that use it is independence. The independence to build a local community and form the best and most appropriate community-led IXP for the region in which it exists. This is also an anti-colonialism / anti-imperialism measure as we’ve seen a number of the larger IXPs establish IXPs well outside their original countries and regions. To my mind, in most cases, this is not the best way to build IXPs and usually leads to transactional IXPs rather than communities.
I also like to think of IXPs as facilitators – if not even guardians to an extent – of net neutrality. When you have for-profit IXPs then the business motive is wealth creation. That is the very definition of for-profit. When this is your motivation then the decisions you make may not necessarily be to the benefit of all your members – especially the weaker / smaller members.
Something I’m fairly satisfied that IXP Manager does give new IXPs is the best possible start. As well as a good leg-up for smaller IXPs that move to the platform. The concepts of secure by design and best current practices are baked into what IXP Manager does. Of course, an IXP will always need staff with network engineering and system admin skills – but we hope that the steep learning curve is very much flattened by the use of IXP Manager. To the extent that the challenges in starting a new IXP should no longer be technical but rather environmental: regional political and regulatory issues, commercial issues such as funding and data centre contracts, and finding members.
Finally, we hope IXP Manager gives new IXPs credibility. The reason (so they’ve told us) that Facebook, Amazon AWS and Netflix (historically) have supported IXP Manager through patronage is that they see the value in coming to a new exchange that has installed and is making good use of IXP Manager. These content networks know that much of the technical elements will be “done right”.
There’s also a reverse angle to this – reputation protection for the rest of us. There are only a few hundred active IXPs worldwide and we’ve all worked really hard to build confidence in our abilities – most as community-led not-for-profit enterprises – to deliver secure, reliable services. It only takes a small few bad actors (such as cowboys looking for a quick profit or inexperienced operators) to sow the seeds of doubt. I hope IXP Manager helps put a large insurance blanket over the rest of us by helping these new IXPs start out in the best possible way.
Epilogue
Our Euro-IX community not only supports IXP Manager. We all support each other – through the forums, mailing lists and virtual meet-ups. That we are all so willing to share information and experiences so openly is the wonderful thing about Euro-IX. Not just an association but a community. It’s a community I’m proud to be a part of and call so many of its members by friends. Here’s to the next 20 years!
Legacy installations of IXP Manager can be very difficult to upgrade as you can find yourself in a dependency nightmare whereby the old version of IXP Manager will not run on modern versions of PHP; and vice versa.
In case you missed it, we have a new modern website for IXP Manager – find it at https://www.ixpmanager.org/. One of the features of this new website is that we now gather IXP Manager usage statistics on a daily basis – including the distribution of versions in use.
Reassuringly, of the installs we can poll for version used, ~65% are using one of the latest three minor versions (5.5.0 – 5.7.0). This is reassuring for a number of reasons including: knowing that IXPs stay current; knowing that IXPs are concerned about security updates; and knowing that the upgrade process is not especially difficult.
Of the 145 installs we know about, we can poll 116 and collect the version is use which yields the following table:
5.x.y
83
4.x.y
26
3.x.y
7
Distribution of major IXP Manager versions in use as at September 8th 2020.
Legacy installations of IXP Manager can be very difficult to upgrade as you can find yourself in a dependency nightmare whereby the old version of IXP Manager will not run on modern versions of PHP; and vice versa.
Community IX Atlanta (CIX-ATL) are in the process of upgrading from 4.9.3 to the latest (5.7.0) and they graciously allowed me to record the process:
The video is a real-life experience where it wasn’t planned in advance allowing the viewer to see the mistakes and thought processes throughout. Also, if you weren’t aware of it, we have an on-going series of IXP Manager tutorials here.
When considering a legacy upgrade, there are two main approaches:
Build a new IXP Manager installation on a new (modern) server and migrate the database (this is what we’ve done here).
Attempt an in place upgrade alternating between IXP Manager upgrades and operating system upgrades. This is probably more awkward with more scope for issues to crop up (especially on non-IXP Manager applications which may be on the same server).
Remember, what’s covered here is “just” the IXP Manager and database upgrade. There’s a bunch of other things that would also need to be done including:
Working through the various upgrade actions in the release notes (mentioned throughout the video). Essentially you’ll need to step through each set of release notes for the versions you cycle through (and jump over).
If building a new server, pointing elements such as route server cron jobs and other API consumers at the new server.
Migrating other applications from the legacy server (e.g. maybe you have mrtg co-installed there).
In a production environment, my goal would be to build the new IXP Manager installation with the copied and upgraded database and run them in parallel. NB: either avoid or duplicate changes made in the UI across both installations of IXP Manager for this period of time.
Once the new installation of IXP Manager is ready for production use, you will then step through all external tools that consume data from it (sflow, mrtg, route servers, route collectors, etc.) and migrate them to the new installation. Sometimes simply updating DNS can achieve most of this but you’ll probably want to take it piece-meal and ensure each external service works as expected.
Take particular care with essential services such as route servers. This is an opportune time to upgrade to Bird v2 and add RPKI. What we did at INEX was do one route server at a time with 1-2 weeks between upgrades. This allowed time to ensure the new system was stable and also to ensure no member issues due to RPKI filtering, etc. (spoiler alert: it was uneventful!).
As you complete the migration, you can also consider if some services should be left on the “old” server. Separating tasks between different servers is good practice and so ask youself if everything should be migrated over to the new server.
More than anything, I hope this video entices you to keep current with your IXP Manager installations!
We call IXP Manager’s statistics and graphing architecture Grapher. It’s a backend agnostic way to collect and present data. Out of the box, we support MRTG for standard interface graphs, sflow for peer to peer and per-protocol graphs, and Smokeping for latency/packet loss graphs. You can see some of this in action on INEX’s public statistics section.
Internet Exchange Points (IXPs) play a significant role in national internet infrastructures and IXP Manager is used in nearly 100 of these IXPs worldwide. In the last couple weeks we have got a number of queries from those IXPs asking for suggestions on how they can extract traffic data to address queries from their national Governments, regulators, media and members. We just published our own analysis of this for traffic over INEX here.
Grapher has a basic API interface (documented here) which we use to help those IXP Manager users address the queries they are getting. What we have provided to date are mostly quick rough-and-ready solutions but we will pull all these together over the weeks (and months) to come to see which of them might be useful permanent features in IXP Manager.
How to Use These Examples
The code snippets below are expected to be placed in a PHP file in the base directory of your IXP Manager installation (e.g. /srv/ixpmanager) and executed on the command line (e.g. php myscript.php).
Each of these scripts need the following header which is not included below for brevity:
We’ve placed a working API endpoint for INEX above – change this for your own IXP / scenario.
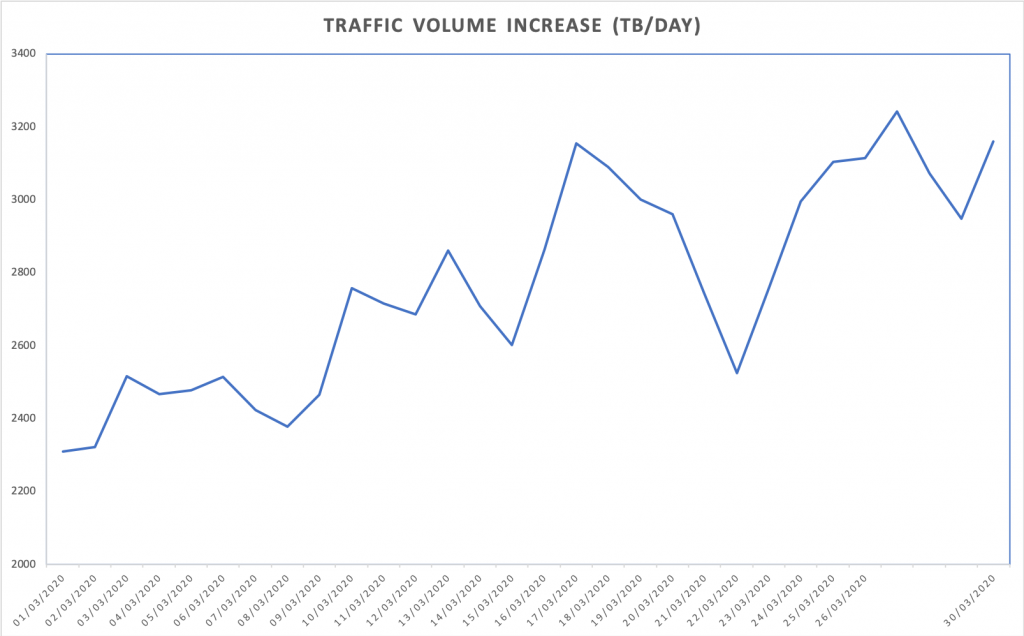
Data Volume Growth
An IXP was asked by their largest national newspaper to provide daily statistics of traffic growth due to COVID-19. For historical reasons linked to MRTG graph images, the periods in IXP Manager for this data is such that: day is last 33.3 hours; week is last 8.33 days; month is last 33.33 days; and year is last 366 days.
This is fine within IXP Manager when comparing averages and maximums as we are always comparing like with like. But if we’re looking to sum up the data exchanged in a proper 24hr day then we need to process this differently. For that we use the following loop:
$start = new Carbon('2020-01-01 00:00:00');
$bits = 0;
$last = $data[0][0];
$startu = $start->format('U');
$end = $start->copy()->addDay()->format('U');

foreach( $data as $d ) {
  // if the row is before our start time, skip
  if( $d[0] < $startu ) { $last = $d[0]; continue; }

  if( $d[0] > $end ) {
    // if the row is for the next day break out and print the data
    echo $start->format('Y-m-d') . ','
        . $bits/8 / 1024/1024/1024/1024 . "\n";

    // and reset for next day
    $bits  = $d[1] * ($d[0] - $last);
    $startu = $start->addDay()->format('U');
    $end    = $start->copy()->addDay()->format('U');
  } else {
    $bits += $d[1] * ($d[0] - $last);
  }

  $last = $d[0];
}
The output is comma-separated (CSV) with the date and data volume exchanged in that 24 hour period (in TBs via 8/1024/1024/1024/1024). This can, for example, be pasted into Excel to create a simple graph:
The elements of the $d[] array mirror what you would expect to find in a MRTG log file (but the data unit represents the API request – e.g. bits/sec, pkts/sec, etc.):
d[0] – the UNIX timestamp of the data sample.
$d[1] and $d[2] – the average incoming and outgoing transfer rate in bits per second. This is valid for the time between the $d[0] value of the current entry and the $d[0] value of the previous entry. For an IXP where traffic is exchanged, we expect to see $d[1] roughly the same as $d[2].
$d[3] and $d[4] – the maximum incoming and outgoing transfer rate in bits per second for the current interval. This is calculated from all the updates which have occured in the current interval. If the current interval is 1 hour, and updates have occured every 5 minutes, it will be the biggest 5 minute transfer rate seen during the hour.
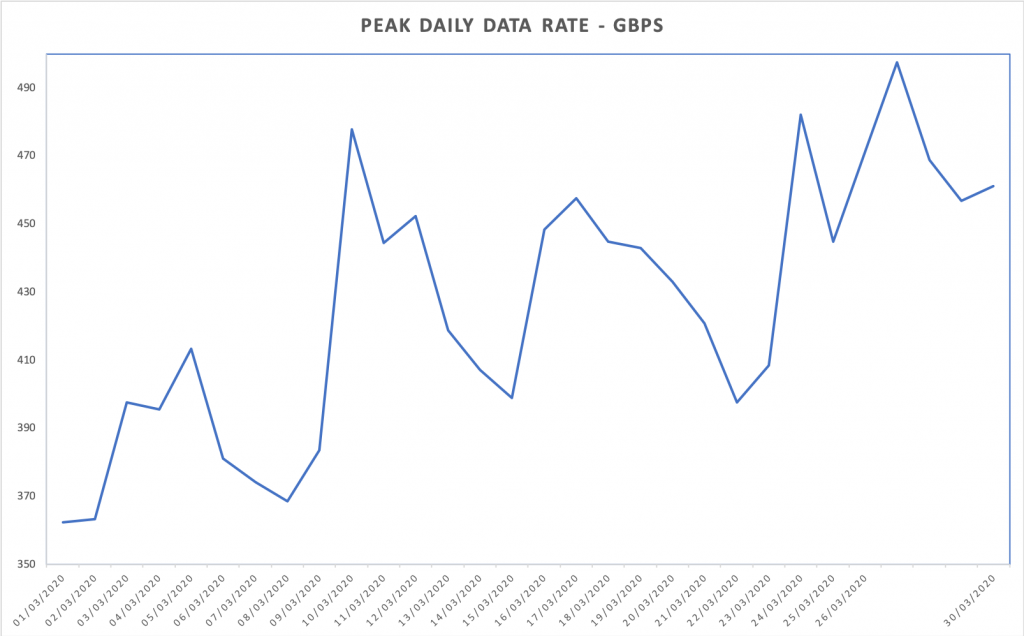
Traffic Peaks
The above snippet uses the average traffic values and the time between samples to calculate the overall volume of traffic exchanged. If you just want to know the traffic peaks in bits/sec on a daily basis, you can do something like this:
The output is comma-separated (CSV) with the date and data volume exchanged in that 24 hour period (in Gbps via 1000/1000/1000). This can also be pasted into Excel to create a simple graph:
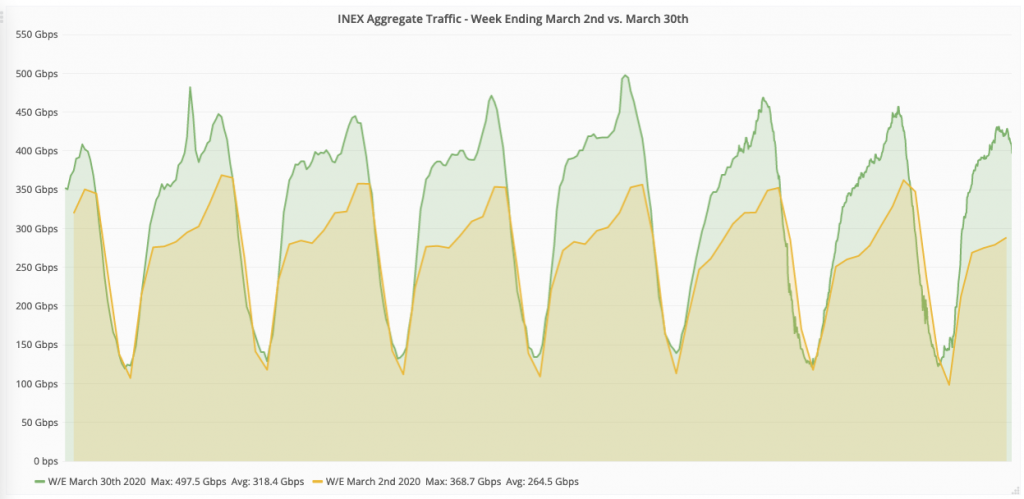
Import to Carbon / Graphite / Grafana
Something that is on our development list for IXP Manager is to integrate Graphite as a Grapher backend. Using this stack, we could create much more visually appealing graphs as well as time-shift comparisons. In fact this is how we created the graphs for this article on INEX’s website which includes graphs such as:
To create this, we need to get the data into Carbon (Graphite’s time-series database). Carbon accepts data via UDP so we used a script of the form:
The Carbon / Graphite / Grafana stack is quite complex so unless you are familiar with it, this option for graphing could prove difficult. To get up and running quickly, we used the docker-grafana-graphite Docker image. Beware that the default graphite/storage-schemas.conf in this image limits data retention to only 7 days.
We’ve just released IXP Manager v5.3.0. The headline feature in this release is two-factor authentication (2fa) and user session management. This blog post overviews the PHP elements on how we did that.
While IXP Manager is a Laravel framework application, it uses Doctrine ORM as its database layer via the Laravel Doctrine bridge. For those curious, this really is a carry over from when IXP Manager was a Zend Framework application. For the migration, we concentrated on the controller and view elements of the MVC stack leaving the model layer on Doctrine. Over time we’ll probably migrate the model layer over to Laravel’s Eloquent.
Before reading on, it would be useful to first read the official documentation we have written aroud 2fa and user session management:
Hopefully the how we did this will be useful for anyone else in the same boat or even just trying to understand the Laravel authentication stack.
Two factor authentication (2fa) strengthens access security by requiring two methods (also referred to as factors) to verify your identity. Two factor authentication protects against phishing, social engineering and password brute force attacks and secures your logins from attackers exploiting weak or stolen credentials.
User session management allows a user to be logged in and remembered from multiple browsers / devices and to manage those sessions from within IXP Manager.
For 2fa, we used the antonioribeiro/google2fa-laravel package which is built on antonioribeiro/google2fa. If we were 100% in Laravel’s eco-system the would have been easier but because we use Doctrine, we needed to override a number of classes.
Structurally we need a database table to indicate if a user has 2fa enabled and to hold their 2fa secret – for this we created Entities\User2FA. Similarly, we have a controller to handle the UI interaction of enabling, configuring and disabling 2fa: User2FAController – this also includes generating QR codes for the typical 2fa activation process.
On the user session management side, we created Entities\UserRememberToken to hold multiple tokens per user (rather than Laravel’s default single token in a column in the user’s user database entry. For the frontend UI, UserRememberTokenController allows a user to view their active sessions and invalidate (delete) them if required.
The actual mechanism of enforcing 2fa is via middleware: IXP\Http\Middleware\Google2FA. This is added, as appropriate, to web routes via the RouteServiceProvider. This will check the user’s session and if 2fa is enabled but has not been completed, then the middleware will enforce 2fa before granting access to any routes covered by it.
Note that because we also implemented user session management via long-lived cookies and because the fact that a user has passed 2fa or not is held in the session, we need to persistently store the fact in the user’s specific remember token database entry. This is done via the Google2FALoginSucceeded listener. This is then later checked in the SessionGuard – where, if we log a user in via the long-lived cookie, we also make them as having passed 2fa if so set.
Speaking of the SessionGuard, this was one of the bigger changes we had to make – we overrode the Illuminate\Auth\SessionGuard as we needed to replace a few functions to make 2fa and user session management work. We have kept these to a minimum:
The user() function – Laravel’s long lived session uses a single token but we require a token per device / browser. We also need to side-step 2fa for existing sessions as discussed above and allow for features such as allowing a user to delete other long-lived sessions and to provide functionality to allow these sessions to expire.
The above constitutes a bulk to the changes. Because 2fa can be enforced via middleware, it doesn’t really touch the core Laravel authentication process. The user session management was more invasive and responsible for the bulk of the changes required in the DoctrineUserProvider and SessionGuard.
While Vue.js‘ popularity continues to sky rocket, there are some alternatives when you want to keep the declarative style but Vue.js is far too much for smaller requirements.
Stimulus is a JavaScript framework with modest ambitions. It doesn’t seek to take over your entire front-end—in fact, it’s not concerned with rendering HTML at all. Instead, it’s designed to augment your HTML with just enough behavior to make it shine. Stimulus pairs beautifully with Turbolinks to provide a complete solution for fast, compelling applications with a minimal amount of effort.
A very recent new framework is Alpine.js which uses the tag-line think of it like Tailwind for JavaScript which, has a huge Tailwind fan, is very intriguing.
Alpine.js offers you the reactive and declarative nature of big frameworks like Vue or React at a much lower cost.
As installed on Ubuntu 19.10, Kamailio v5.3 will not work out of the box with MySQL 8 due to changes in the way in which users are created and privileges granted between MySQL 5.x and 8.
To fix this, edit /usr/lib/x86_64-linux-gnu/kamailio/kamctl/kamdbctl.mysql as follows:
# diff /usr/lib/x86_64-linux-gnu/kamailio/kamctl/kamdbctl.mysql.orig  /usr/lib/x86_64-linux-gnu/kamailio/kamctl/kamdbctl.mysql
163,164c163,166
<       sql_query "" "GRANT ALL PRIVILEGES ON $1.* TO '${DBRWUSER}'@'$DBHOST' IDENTIFIED BY '$DBRWPW';
<               GRANT SELECT ON $1.* TO '${DBROUSER}'@'$DBHOST' IDENTIFIED BY '$DBROPW';"
---
>       sql_query "" "CREATE USER '$DBRWUSER'@'$DBHOST' IDENTIFIED BY '$DBRWPW';
>                     CREATE USER '$DBROUSER'@'$DBHOST' IDENTIFIED BY '$DBROPW';
>               GRANT ALL PRIVILEGES ON $1.* TO '${DBRWUSER}'@'$DBHOST';
>               GRANT SELECT ON $1.* TO '${DBROUSER}'@'$DBHOST';"
172,173c174,177
<               sql_query "" "GRANT ALL PRIVILEGES ON $1.* TO '$DBRWUSER'@'localhost' IDENTIFIED  BY '$DBRWPW';
<                       GRANT SELECT ON $1.* TO '$DBROUSER'@'localhost' IDENTIFIED BY '$DBROPW';"
---
>               sql_query "" "CREATE USER '$DBRWUSER'@'localhost' IDENTIFIED BY '$DBRWPW';
>                               CREATE USER '$DBROUSER'@'localhost' IDENTIFIED BY '$DBROPW';
>                       GRANT ALL PRIVILEGES ON $1.* TO '$DBRWUSER'@'localhost';
>                       GRANT SELECT ON $1.* TO '$DBROUSER'@'localhost';"
181,182c185,188
<               sql_query "" "GRANT ALL PRIVILEGES ON $1.* TO '$DBRWUSER'@'$DBACCESSHOST' IDENTIFIED  BY '$DBRWPW';
<                       GRANT SELECT ON $1.* TO '$DBROUSER'@'$DBACCESSHOST' IDENTIFIED BY '$DBROPW';"
---
>               sql_query "" "CREATE USER '$DBRWUSER'@'$DBACCESSHOST' IDENTIFIED BY '$DBRWPW';
>                             CREATE USER '$DBROUSER'@'$DBACCESSHOST' IDENTIFIED BY '$DBROPW';
>                       GRANT ALL PRIVILEGES ON $1.* TO '$DBRWUSER'@'$DBACCESSHOST';
>                       GRANT SELECT ON $1.* TO '$DBROUSER'@'$DBACCESSHOST';"
The above worked fine for me but do note:
Make sure the database and users do not already exist on the database (or delete them if they do).
Use a different username for the read-only and read-write users.
MySQL 8 has a bug so issue FLUSH PRIVILEGES if you have trouble manually removing a user.
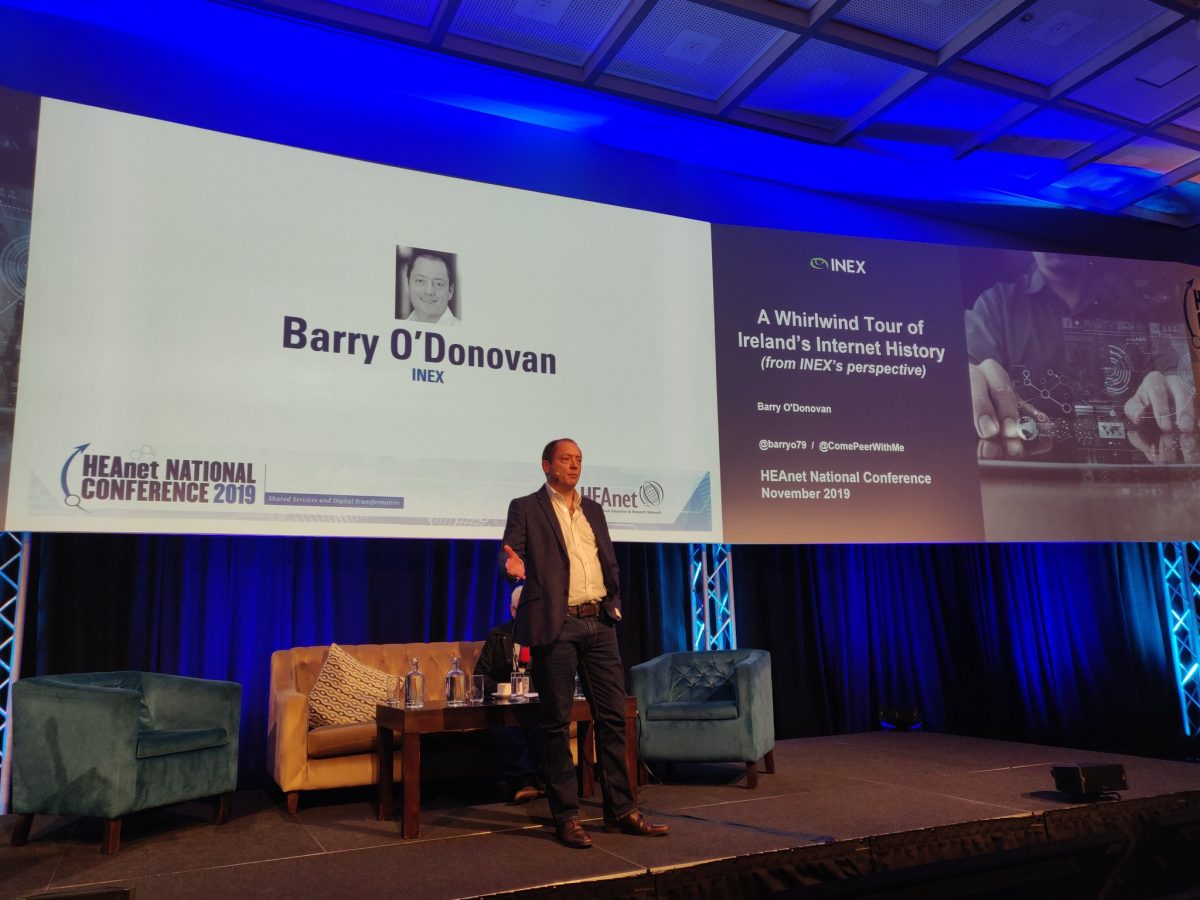
I had the pleasure of giving a talk at HEAnet’s National Conference 2019 last Friday on Ireland’s internet history as seen from INEX’s perspective. HEAnet is a founding member of INEX and one of our greatest supporters. They were the first to order a 10Gb port way back when they were new and shiny; and again the first to order a 100Gb port when they became available in 2015. Both of these were collaborative efforts allowing us each to get familiar with this new technology.
Ireland’s internet history – especially the dial-up era – has many fascinating stories. I was of school-going age when this all kicked off but there are some recent excellent projects covering the era and well worth a bedtime read.
The History of the Irish Internet – internethistory.ie – by Niall Richard Murphy. As well as telling his own story, Niall sat down with luminaries of that era including INEX’s own Nick Hilliard and Barry Rhodes.
The TechArchives project which collects stories about Ireland’s long and convoluted relationship with information technology and preserves them. This is done through personal testimonies and includes people such as Barry Flanagan who formed one of Ireland’s first dial-up ISPs from his garage in Galway and gave me my start in the ISP industry; and Barry Rhodes whose history with Ireland’s internet starts long before INEX.
For INEX’s 20th anniversary, we undertook a project to record the history of the exchange which can be found here – it also includes some personal reflections from those involved in its early days.
Single-page applications (SPAs) are web-based applications that rewrite the current browser DOM rather than doing full page reloads. They look and feel responsive and crisp but are pretty complex to write. At least differently complex – the balance of developer knowledge moves from backend templates and view logic to pretty heavy frontend JavaScript. It’s also quite hard to migrate traditional web-based applications.
Some of the more popular SPA frameworks include Vue.js with Vue Router; Ember.js; and AngularJS. For anyone coming across this for the first time, Vue.js looks really interesting.
There’s a new framework that works with Laravel and tries to bridge the gap between the traditional full page reload model and the new SPA model called Inertia.js. Jonathan’s stated goal with this is:
I wanted to blend the best parts of classic server-side apps (routing, controllers, and ORM database access) with the best parts of single-page apps (JavaScript rendering and no full page reloads).
There’s also a second new framework that’s in this between-two-houses-mould but still quite different called Livewire. It really is best to look at the code to see how this works – it really is different but also very interesting.