In case you missed it, we have a new modern website for IXP Manager – find it at https://www.ixpmanager.org/. One of the features of this new website is that we now gather IXP Manager usage statistics on a daily basis – including the distribution of versions in use.
Reassuringly, of the installs we can poll for version used, ~65% are using one of the latest three minor versions (5.5.0 – 5.7.0). This is reassuring for a number of reasons including: knowing that IXPs stay current; knowing that IXPs are concerned about security updates; and knowing that the upgrade process is not especially difficult.
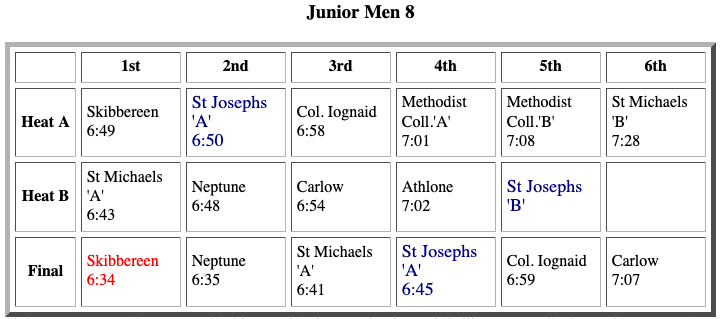
Of the 145 installs we know about, we can poll 116 and collect the version is use which yields the following table:
| 5.x.y | 83 |
| 4.x.y | 26 |
| 3.x.y | 7 |
Legacy installations of IXP Manager can be very difficult to upgrade as you can find yourself in a dependency nightmare whereby the old version of IXP Manager will not run on modern versions of PHP; and vice versa.
Community IX Atlanta (CIX-ATL) are in the process of upgrading from 4.9.3 to the latest (5.7.0) and they graciously allowed me to record the process:
The video is a real-life experience where it wasn’t planned in advance allowing the viewer to see the mistakes and thought processes throughout. Also, if you weren’t aware of it, we have an on-going series of IXP Manager tutorials here.
When considering a legacy upgrade, there are two main approaches:
- Build a new IXP Manager installation on a new (modern) server and migrate the database (this is what we’ve done here).
- Attempt an in place upgrade alternating between IXP Manager upgrades and operating system upgrades. This is probably more awkward with more scope for issues to crop up (especially on non-IXP Manager applications which may be on the same server).
Remember, what’s covered here is “just” the IXP Manager and database upgrade. There’s a bunch of other things that would also need to be done including:
- Working through the various upgrade actions in the release notes (mentioned throughout the video). Essentially you’ll need to step through each set of release notes for the versions you cycle through (and jump over).
- If building a new server, pointing elements such as route server cron jobs and other API consumers at the new server.
- Migrating other applications from the legacy server (e.g. maybe you have mrtg co-installed there).
In a production environment, my goal would be to build the new IXP Manager installation with the copied and upgraded database and run them in parallel. NB: either avoid or duplicate changes made in the UI across both installations of IXP Manager for this period of time.
Once the new installation of IXP Manager is ready for production use, you will then step through all external tools that consume data from it (sflow, mrtg, route servers, route collectors, etc.) and migrate them to the new installation. Sometimes simply updating DNS can achieve most of this but you’ll probably want to take it piece-meal and ensure each external service works as expected.
Take particular care with essential services such as route servers. This is an opportune time to upgrade to Bird v2 and add RPKI. What we did at INEX was do one route server at a time with 1-2 weeks between upgrades. This allowed time to ensure the new system was stable and also to ensure no member issues due to RPKI filtering, etc. (spoiler alert: it was uneventful!).
As you complete the migration, you can also consider if some services should be left on the “old” server. Separating tasks between different servers is good practice and so ask youself if everything should be migrated over to the new server.
More than anything, I hope this video entices you to keep current with your IXP Manager installations!